Practical Nginx: A Beginner’s Step-by-Step Project Guide

Hi guys.
Story
I think it’s been around one month since I started researching micro frontends and their architecture to learn more. Suddenly, I came across a micro frontend strategy called Route Distribution, check article. While exploring this strategy, I encountered a confusing Nginx configuration. At that moment, I felt a bit discouraged because of Nginx 😅. Then I watched Steve Jobs’ talk at Stanford (I love him, watch the video) and got the energy to move on (Thanks, Steve) 😁. After that, I realized how important Nginx is and decided to learn it. I searched for information and did some basic configuration. I thought it might be helpful to share my knowledge and code, so you can check out the repo.
Roadmap
First, we will talk about the basics of Nginx, then we are going to start with a simple version to serve an HTML page, then we will work on configuring a basic load balancer and some exercises, and finally, we will finish with the React app.
Nginx Elements
Before we dive into the configuration, it’s worthwhile to explore the fundamental elements and get a basic understanding of Nginx’s architecture. Nginx consists of two main components: the master process and the worker processes.
The master process handles tasks such as reading configurations and binding to ports, and it creates a limited number of child processes, including the cache loader, cache manager, and worker processes. The worker processes are single-threaded, operate independently, and manage incoming connections.
I won’t go into all the details here, but if you’re interested in learning more about Nginx’s inner workings, I recommend checking out this blog.
In Nginx, we have 3 common elements:
- Directives: instructions that are used to configure the web server
- Includes: It refers to additional files that NGINX should use for configuration, it is a kind of directive.
- Context: It refers to the specific section of the NGINX configuration you are working with, similar to how scope is defined in programming languages
We have two kinds of directives:
- Simple Directives: A simple line that ends with
; - Block Directives: These are multiple-line commands, with an opening and closing curly brace
{}.
Contexts
We have some important contexts:
Events: The “events” context exists within the “main” context and is utilized to configure global settings that influence NGINX’s handling of connections on a broad scale.
# main context

events {
    # events context
    . . .
}Http: We config high-level HTTP parameters — logging, data types, timers, include files
Server: We set virtual server parameters — listen port, hostname, access log, and include files here.
Upstream: This context defines a named pool of servers that Nginx can then proxy requests to. This context will likely be used when you are configuring proxies of various types.
Main: Any configuration in this area is related to Nginx startup, like worker-process directives. It is the global scope of Nginx configuration.
#Main context

# Main directive
user nobody;
worker_processes 1;
....
....

#events context
events {
       # events directive
       ....
       ....
}
# http context
http {
      # http directive
      ....
      ....
}
There are other contexts, like:
- split_clients → for A/B testing
- geo → used to categorize client IP addresses
Steps
Now it is time to start from the first step and see configs.
Step 1 (Hello World)
In the first example, we configure a Nginx server to return different responses on ports 8081 and 8082. The key aspect of this configuration is the listen directive, which specifies the ports we want to use. Additionally, we demonstrate how to use multiple server blocks within the http context.
events {}

http {

    server {
        listen 8081;
        # name of server, in local we set to localhost
        server_name localhost;
        return 200 "Hi there!, This is 8081!\n";
    }

    server {
        listen 8082;
        server_name localhost;
        return 200 "Hi there!, This is 8082!\n";
    }
}
Step 2 (Static Files)
Next, let’s take it a step further by loading static files and HTML. To load static files, we need to add that folder to the path of the static folder in Dockerfile:
COPY images /usr/share/nginx/static/images/Then, in the nginx.conf, we set the root directory for the HTML and static files. Nginx will automatically serve the .html files from this folder, so we need to specify the root directive. Another important part is, include types that we add the following directive:
include /etc/nginx/mime.types;This ensures that when Nginx serves a static file, it returns the correct Content-Type to the client. While Nginx inherently understands the HTML type, including mime.types in our configuration allows it to correctly identify and serve various other file types. You can check the code.
Step 3 (Location and Route)
In this step, we will explore the concept of location directives in NGINX. Location directives allow you to extend the configuration based on the URI (Uniform Resource Identifier) of the incoming request. This enables NGINX to handle different requests in various ways, depending on the request’s path. To effectively use location directives, it’s important to understand the different types of modifiers available:
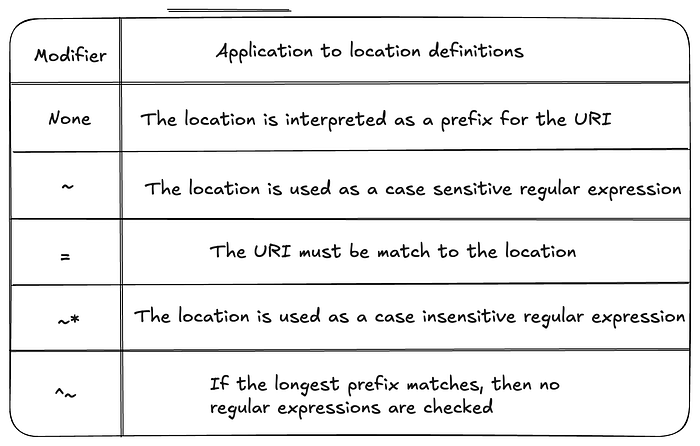
for instance, you can add without a modifier, but you are setting it as a prefix
# /list or /list-users
# http://localhost:8080/list/sdfdsf
# http://localhost:8080/list
# http://localhost:8080/list?name=%22Scd%22
location /list {
    return 200 "This is list page, all kind of list pages";
}
or you can add a regex, it handles /blog1 and /blog + any number
location ~* /blog[0-9] {
    return 200 "hello!\n";
}
If you want to see more examples check the code.
Step 4 (Worker)
To understand how NGINX handles workload, it’s important to know about worker processes and worker connections.
- Worker Processes: This refers to the number of worker threads NGINX creates. Each worker process can handle multiple connections simultaneously. By default, NGINX creates one worker process for each CPU core available on the system, ensuring optimal performance. It is recommended to set the number of worker processes to
auto, which dynamically adjusts to the number of CPU cores. - Worker Connections: This parameter specifies the maximum number of connections each worker process can manage at one time. The ideal number of worker connections depends on both the number of CPU cores and the maximum number of files your operating system allows to be opened per core.
In the example we set the worker process to auto and worker connection to 1024, but if you are interested in that what is the optimal number you can see this link.
Step 5 (Cache)
In this step, it is important to consider caching static files. Caching helps to improve performance by telling the browser or server to store and reuse content. There are different headers that support various caching mechanisms. For a detailed explanation, I recommend checking the Cloudflare article on caching. For Nginx, we can add headers and set expiration times in our location block to manage caching. Here is how you can do it:
        location ~* \.(css|js|jpg)$ {
            add_header Cache-Control public;
            #  backwards compatibility with the HTTP/1.0 caches
            add_header Pragma public;
            # This response varies based on the value of the Accept header of your request
            # https://www.smashingmagazine.com/2017/11/understanding-vary-header/
            add_header Vary Accept-Encoding;
            # 1 Month
            expires 1M;
        }
Step 6 (Gzip)
Another important consideration is the size of the files. We can reduce file sizes using gzip compression. Gzip is a popular file format used for file compression, and we can enable it in NGINX using the gzip directive.
We can enable gzip compression in NGINX using the gzip directive. To customize the level of compression, use the gzip_comp_level directive. Additionally, specify which file formats to compress using the gzip_types directive.
You should add the following code in the HTTP context.
    gzip on;
    # Becauses we added vary in add header line, it is not required here, i think.
    gzip_vary on;
    gzip_comp_level 3;
    gzip_types text/css application/javascript;
To see the gzip-compressed version of a response from the server, you need to include the Accept-Encoding: gzip header in your request. This tells the server that you can handle gzip-compressed content. For instance, in this example, I added react code, then I curled and saved the loaded version with a different header and I saw a good reduction in the size of the files. you can do it:
curl http://localhost:8080/react.js > react-unzip.js
curl -H "Accept-Encoding: gzip" http://localhost:8080/react.js > react-zip.js
Step 7 (Proxy aka Reverse Proxy)
Now it is time to test the proxy. For example, if you want to proxy your home page to another server, you can use the proxy_pass directive.
We have a little same behavior in return, rewrite, and proxy, but they are different:
- return: if you want to redirect without any changes in the request or without the need to redirect to another server.
- rewrite: If you need to modify the request URI (e.g., for URL rewriting) but don’t need to forward the request to another server
- Proxy: If you want the request to be fully processed by another server
so in this example, we have this simple configuration:
location /home {
    proxy_pass https://nginx.org/;
    # proxy_http_version 1.1;
    # proxy_set_header Host $host;
    # proxy_set_header X-Real-IP $remote_addr;

    # Without this, we will face an error
    # Enable passing the server name during SSL handshake
    proxy_ssl_server_name on;
}
Step 8 (Load Balance)
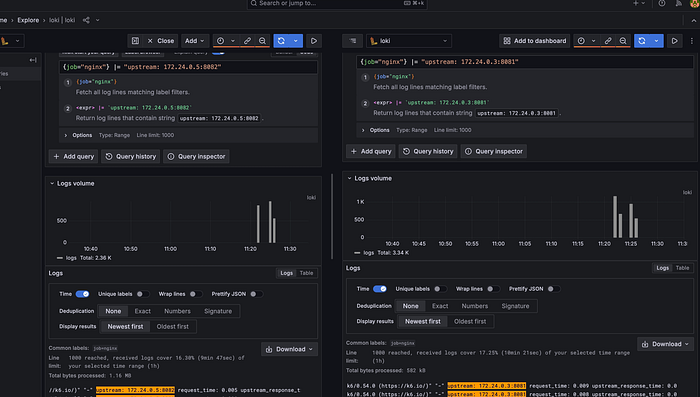
In this step, we will simulate load balancing using two simple Python applications along with NGINX configuration. Load balancing involves distributing incoming requests across multiple servers to reduce the load on each server. Fortunately, NGINX makes this easy to configure using the upstream directive.
For example, in the following configuration, we define our servers and implement a “least connections” strategy. If you want to learn more about different load-balancing methods, please check the documentation.
    upstream backend {
        least_conn;
        server app1:8081;
        server app2:8082;
    }
Also in this example, I added Grafan and k6, to see what happens, you can check it if you are interested. The main goal is to see requests divided correctly, for instance, you can see that requests are distributed fine.
Step 9 (Rate Limiter)
Rate Limiting is so important because it protects us against DDoS attacks, It allows you to limit the amount of HTTP requests a user can make in a given period of time. Also, you can limit the number of connections and bandwidth.
To add a rate limiter, we should add the number of requests per second we want, we can set something like rate=50r/s, it means up to 50 requests per second is okay. Also, we have Zone that defines the shared memory to store the state of each IP address. Based on the Nginx blog, State information for about 16,000 IP addresses takes 1; megabyte,
In the end, we use limit_req_zone directive to add rate limiter.
http {
    # Key ($binary_remote_addr): This is the client’s IP address in a binary
    # format. It’s used as a key to apply the rate limit, meaning each
    # unique IP address is subjected to the rate limit specified.
    limit_req_zone $binary_remote_addr zone=mylimit:1m rate=50r/s;

    include /etc/nginx/conf.d/*.conf;
}
Then we add this config to our server block
limit_req zone=limit burst=10 nodelay;The burst parameter allows a burst of 10 requests above the set rate before enforcing the limit. The nodelay option ensures that excess requests within the burst limit are processed immediately without delay. if you want to see full config check it.
Step 10 (Load React App)
Now, in the last step, we want to serve a simple React app with Nginx. In this example, I added gzip, worker, and locations to serve the React App correctly. Maybe this configuration is not enough for a scalable app, but it gives some insight.
Conclusion
I wanted to do some basic and important configuration of Nginx and certainly Nginx is a big world that we can only learn some of them. So I hope these steps will be helpful and motivate you to go on to learn more about it. If you see an issue or a wrong sentence, please tell me.
Thanks for your time and attention.
